counter to blogger

Sunday, July 26, 2009

My other Jensen...... A 1974 Jensen Healey


I am not much of a photographer, but i thought I would post a few pictures of my daily driver Jensen Healey. I am fortunate to be able to drive this car regularly as it has been extensively restored over the years.  It's not perfect, but it is a very reliable car for the most part.

One of the funniest things my daughter ever said to me ( because she did not mean it to be funny) was the first question she asked me when she saw the Jensen parked in the driveway for the first time. She was 14 years old and said... "Hey Dad, it's a cool car but what are those things on the inside of the door next to the windows" ?  I looked kind of puzzled and walked over to the car  and as she pointed them out I just laughed and realized how "old" I am getting. I told her those were window cranks and they raise and lower the windows when they are turned clockwise and counterclockwise. I then realized she was clueless as every car we have bought since she was born always had power windows operated by a small switch.  I think she was completely blown away when I inserted an "8" track tape in the player and told her that what we used to listen to music  with in a car when I was her age.

Anyway, my JH is pretty modified and many purists would cringe, but I just love the extra reliabilty and performance the car has from the modifications. 

My JH is configured as follows:
1) 2.0 liter with delta high compression pistons and 2 - 107 cams, chrysler 318 bearing conversion
2) Green dot cam pulleys  with 40,000 timing belt change
3) Dellorto Carbs ( 45mm)
4) petronix  ignition
5) k+n Filters
6) gear reduction starter
7) Thermostatically controlled Flexlite electric fan
8)Headlight relays
9) toyota 5 speed w55 transmission
10) 12 circuit american electrical system ( blade fuses) - painless wiring
11)  Heater shutoff valve installed
12) complete undercoating after replacing floor pans
13) masterlube pressure lube system


When I first had the car painted, I remembered JHPS member Mitch Ware, who has a beautifully restored JH  in NY. He painted is a nice BRG, which I though was beautiful. Sherman Taffel, from MD, also owns a nice Jensen GT also painted BRG. I found a BRG with a slight metallic addition which closely matched Mitch's car and Sherman's car. It is called Jaguar racing green from the 2005 versions of their cars. They no longer offer it as an available paint for their current lines of cars but it is easily attainable with the proper paint code.

Here's a few pictures of my car. The sun is NEVER out when I have a camera. The car actually looks better than this, but it was completely overcast when I took the pictures. we have had a horrible summer for driving top down as almost every day is rainy, overcast, or cold. 


Sunday, July 19, 2009

Preparation of the Jensen GT Travel Kit

The car is probably at least a few weeks away from being ready to drive home. The engine should be installed soon and the mechanic is just waiting for the arrival of a new header ( the original one has too many leaks) and 5 speed transmission kit which contains a box  with a new clutch, pressure plate, and throwout bearing. It didn't need the clutch parts yet, but the mechanic figured I only have about 10,000 more miles on the original, so I might as well replace the thing while everything was exposed and opened up.

In anticipation of my Dad and I traveling to pick up the Jensen GT, I started assembling the standard "Travel Kit" which all british car owners should keep with them. I learned about this from attending various Jensen meets and inspecting their trunks. I guess I have had it pretty easy in a sense with my Jensen Healey which was restored years ago. I never carried anything around but some extra oil and maybe a flashlight. my portable GPS was my best friend in the car. I drove around for years up and down the east coast and to western NY a bunch of times without much going wrong, but I figured I am flirting with disaster and at some point, I am just going to break down on the road.

I've learned quite a bit from other experts with Jensens at the various events around the northeast, so i took the time to organize my survival kit. The basic idea being...... it there is a small problem, I have a least a 50% chance of fixing it and moving on ( or at least have the parts on hand for someone else to fix). I bought a couple of storage containers at walmart measuring 17 inches X 13 inches with a sealable top.
I stuffed the following things in the two storage containers and plan to put it in the Jensen GT when I pick it up:

1) Flashlight w/batteries
2) 2 carb rebuild kits ( I shouldn't need these, but you never know)
3) socket/open end wrenches w/ screwdrivers
4) Duct Tape
5) Radiator hoses ( all 3 ) just in case.
6) Thermostat w/gasket
7) a Selection of fuses
8) various hose clamps
9) fan belt
10) disc brake pads
11) Voltmeter
12) connectors/wire strippers etc.
13) Fuel filter
14) Knife and various other tools

In another bigger crate:

4 Quarts oil ( vr-1 racing 20w/50) very hard to find in Maine. I usually buy it when I first see it in the spring, or just stock up in New Hampshire.
 brake fluid
50/50 mix antifreeze

As one Jensen owner told me at the Nationals this year........... "You Gotta carry Fluids with you, it's a British car, it tends to mark its territory more than a dog"

I didn't put in a spare fuel pump like I have in the trunk of my JH. My JH fuel pump is very easy to replace in the trunk and costs less than $50.00. It is very easy to replace and can be done in minutes on the road. The Jensen GT fuel pump is located under the car ( where the gas tank is located) and the cost of that fuel pump is about $250.00, so I may get a spare some day, but I definately won't be crawling around under the car to replace it on the road. The new one I put in this year should last a while.

Next...... final car preparations before the trip, interior shops and estimates,  and the adventure of driving it home from Salamanca NY.


Friday, July 17, 2009

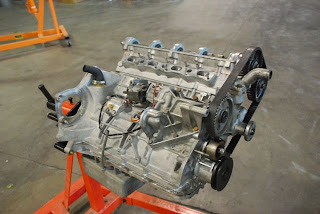
The Lotus 907 engine


The Lotus engine sat idle in storage for about 32 years. The compression readings were low and after a "leak down" test was performed, one could conclude the rings were stuck after so many years of inactivity. I decided to have it dropped off at the machine shop in Olean, Ny for a disassembly, and general checkover. The engine didn't need a complete rebuild by any means, but anything which hasn't been run to a long time deserves a general checkover while things are opened up.


The Engine was dropped off at Glen and Dicks Automotive machine shop and the exploritory surgery was performed by a machinist over a period of quite a few months.

Once the engine was broken down the piston bores honed and pistons re-ringed, I decided to replace the main bearings and all the gaskets at the same time. I also replaced 2 suspect valves which looked just a little worn.


The cost was extremely reasonable and the labor quality was excellent.

A breakdown of total costs follows:


1. Assemble and diassemble lotus 907 engine.............. $1320.00

2. Resurface flywheel and R+R pins............................... $60.00

3. resurface aluminum head.............................................$ 50.00

4. valve job (16 valve).......................................................$150.00

5. 2 replacement lotus valves............................................$ 18.00

6. gasket set..........................................................................$150.00

7. 1 set main bearings...........................................................$125.00

8. hone 4cyl block and align.................................................$90.00

9. sealant.................................................................................$38.00

10. Replace tensioner bearings............................................$24.90

11. Plugs ( soft... brass and stainless steel)........................$11.22

12. Degrease and clean engine.............................................$150.00

13. Check and polish crankshaft...........................................$50.00

14. R+R pistons on rods, glass bead, and hone pin bores..$60.00


Total Price................................................................................$2297.12


The attached picture shows the Lotus 907 awaitng the manifold, the carburators, and the other accessories before install.


Next.... new tires, engine install and a test drive...........


Thursday, July 2, 2009

5 Speed Shifter Rebuild continued.....


And now, back to our exciting conclusion of the 5 Speed Getrag Shifter rebuild process.......


LET’S COMPARE OLD AND NEW PARTS


Rubber parts on this Shifter must have been made with 1920’s technology. Most of the Shifter assemblies that I’ve seen have rubber parts that are melted and fully deteriorated. Ditto for the plastic bushings. I replace the plastic with Bearing Bronze, and use new rubber bushings that I buy from Delta – probably the same crappy rubber, but what the heck, it will last another 20 years and can easily be replaced (this is the only part that is easy to replace).
Then there are the small 0.235 diameter pins that fit in the linkage. Well, these are always bent (you can actually see the bend in the photo, lower right) and the holes have been forced into an hourglass shape. I replace these with case-hardened larger diameter pins. Of course, the mating holes have to be drilled out to the new diameter.
The sand contamination generally wears out the bearing holes in the aluminum casting, so the casting holes are opened to a larger diameter and new bronze bushings are inserted. See the photo of the new pins being inserted in the bushings in the “assembly” section below.


Time = 0 hr. (This photo was for the blog only.)


PRECISION ASSEMBLY


In order to obtain the best possible performance from the Shifter, I hold the machining tolerances to +/- 0.001 in. Sometimes I must use “persuasion” to get the parts to fit together.
If I specified “line bore” on my drawings, the shop would charge me twice what I now pay. I can make the necessary adjustments myself – my labor is free ! ! !
Really, it takes a few hours to get the assembly properly put together, with solid bearing function and elimination of all the slop that was in the original assembly.
Time = 2 hr. plus 1 beer.


ASSEMBLE SHIFTERS AND LUBRICATE
Once the bearing sets are carefully seated, the final step is to lubricate and perform final assembly. That is the easy part. Easy is a relative term – in this case, it means no filing, sanding, burnishing etc. But, oiling and greasing is a messy business and I want to be certain that all the bearing surfaces have sufficient lubrication for the next 20 years of use. I apply three different types of Loctite to several places so the external bearing inserts don’t rotate and the set screw won’t back out.
Did you know that Loctite takes over an hour to dry???????? Have a beer while it’s hardening.
Time = 1 hr. plus 1 beer.


PACK AND SHIP
After assembly, the Shifter is a thing of beauty !
---Run to the Post Office to get a Priority packing box.
---Pack Kit in box.
---Enter address and tape box.
---Run back to the Post Office to ship. Wait in line.

Time = 1 hr. No beer. Well, after I get back from the Post Office, I had a couple………….

FINAL THOUGHTS
o These Kits turned out better than the mods I made to YELODOG Shifter – well, someone was paying me, so I felt compelled to do the best work possible.
o Fourteen hours of my effort per Kit – that’s a lot.
o 10 beers + 1 glass of red wine. I should charge for the beer…………….
o If I had orders for only one Shifter, I would be losing major $ because of machine shop costs. Having 3 sets of parts made at one time means that the shop had only one “set-up” per part.
o Set-up usually takes much longer than the actual machining of these simple parts. (while I attended university, I worked in a small shop and during my engineering career, I sent parts to machine shops on a regular basis)
o Set-up for one of the bronze bearings might take about 1 hr – machining each takes about 10 minutes. Thus:
§ Two parts at 40 minutes per part
§ Six parts at 20 minutes per part
o I’m happy to go through this effort for the benefit of other JH owners – a sloppy Shifter is a bummer !
o No, I don’t do installations.
o Memo to self: Do not take an order for only one Shifter Kit ! ! !