counter to blogger

Saturday, November 7, 2009

JH gets an improved cooling system.....

The Jensen Healey came standard with a 2-row radiator and a yellow plastic fan. I never had any serious problems with engine temperature, but after I had the engine rebuilt with a much higher performance package ( more Horsepower), I noticed my temperature gauge creeping past the 3/4 mark when idling in the city. This was not overheating, but on a prolonged idle combined with a high outside temperature, things could get dangerously close to overheating. I drove it the rest of the summer with my eye on the gauge as I really didn't want to stress things to much. I always made sure I was near a highway or back road for a quick cool down once the car got up to speed. Even when the car is cruising on the highway, the temperature was a couple needle widths above the center mark.

I decided to check out my upgrade options to get me a little more piece of mind when idling for long periods. I brought the car to a mechanic with quite a bit of experience with Lotus Esprits ( which some versions used the same engine more or less). He recommended I perform the following steps to solve my cooling problem as he used the same steps when dealing with other healey's and Esprits.

1) Check water pump for proper operation and ensure it is in spec.
2) Replace thermostat with a 170 degree opening version
3) Send out radiator to be modified
4) install radiator shroud - available for healey's.

Cost breakdowns and results follow:

1) Pulled water pump, found some Old LOTUS tech manuals for the 907 and measured the water pump play and vanes to ensure within specification. The water pump checked out fine.... Time.... 40 Minutes - $40.00

2) Replaced thermostat and gasket with new one from Lotus supplier... Cost ..$11.00
no charge for labor as it was part of the water pump checking.

3) Radiator modification - Change to 3-row, modifed cooling tube fin layout. 1 hour remove and replace $60.00 - special "Hot Rod" radiator ( that's what the radiator shop calls it) $275.00

4) Install Radiator shroud - Parts $40.00 ( he had a used one kicking around) labor $25.00

Total Cost = $451.00

The results were phenomenal and well worth the bucks. The car idled for over 45 minutes and never went higher than 1/2 to cente r ( 1/4 of entire range) Outside air temperature was 55 degrees. I am confident when the outside temp heats up the car will operate in the mid range on the gauge.


Friday, October 23, 2009

The Jensen GT is almost ready.........

Where has the summer gone. I enjoyed driving my Jensen Healey convertable and I really the the jensen GT would be ready for pick up shortly or at least it would be in my garage by early August.

Well, it was not meant to be. Kenny ( the only mechanic) got pretty busy and just never got around to attending to the final touches so the car would be ready for the 12 hour drive back to Maine. I got a little frustrated as I really didn't want the car to sit out in the lot over another winter after I just spent a bunch of money on a new paint job. The car still needed a few things but I thought it was mainly the interior. The headliner needed replacing. The carpet was eating by mice and stinky. I found an original interior kit ( Leather) with a new carpet and was anxious to drive the car home so I could install the finishing touches.

A few weeks ago, Kenny calls me up as proclaims " I just need a few more things to finish the car". I could only wonder what it could be as I was convinced almost everthing on the engine and underbody had been replaced and checked. Kenny gave me the following list:

1) Speedometer cable

2) Driveshaft needed replacing immediately

3) Fuel sender unit and seal needed replacing


The speedometer cable and driveshaft were easy. Delta Motorsports in Arizona had both parts in stock. The driveshaft was even upgraded to a one piece shaft instead of the original two piece shaft. The Fuel Sender unit was a little more of pain, but it is amazing what people can fix nowadays. The fuel gage unit looked awful..... rusted, cracked, leaking and a seal which was not capable of sealing anything anymore. Delta motorsports sends them away to an undisclosed place and in about a week later, the sending unit comes back at looks perfect. It look exactly like a brand new one. It has been tested and a brand new rubber seal is installed.

Things should be moving along much quicker now.....

Sunday, July 26, 2009

My other Jensen...... A 1974 Jensen Healey


I am not much of a photographer, but i thought I would post a few pictures of my daily driver Jensen Healey. I am fortunate to be able to drive this car regularly as it has been extensively restored over the years.  It's not perfect, but it is a very reliable car for the most part.

One of the funniest things my daughter ever said to me ( because she did not mean it to be funny) was the first question she asked me when she saw the Jensen parked in the driveway for the first time. She was 14 years old and said... "Hey Dad, it's a cool car but what are those things on the inside of the door next to the windows" ?  I looked kind of puzzled and walked over to the car  and as she pointed them out I just laughed and realized how "old" I am getting. I told her those were window cranks and they raise and lower the windows when they are turned clockwise and counterclockwise. I then realized she was clueless as every car we have bought since she was born always had power windows operated by a small switch.  I think she was completely blown away when I inserted an "8" track tape in the player and told her that what we used to listen to music  with in a car when I was her age.

Anyway, my JH is pretty modified and many purists would cringe, but I just love the extra reliabilty and performance the car has from the modifications. 

My JH is configured as follows:
1) 2.0 liter with delta high compression pistons and 2 - 107 cams, chrysler 318 bearing conversion
2) Green dot cam pulleys  with 40,000 timing belt change
3) Dellorto Carbs ( 45mm)
4) petronix  ignition
5) k+n Filters
6) gear reduction starter
7) Thermostatically controlled Flexlite electric fan
8)Headlight relays
9) toyota 5 speed w55 transmission
10) 12 circuit american electrical system ( blade fuses) - painless wiring
11)  Heater shutoff valve installed
12) complete undercoating after replacing floor pans
13) masterlube pressure lube system


When I first had the car painted, I remembered JHPS member Mitch Ware, who has a beautifully restored JH  in NY. He painted is a nice BRG, which I though was beautiful. Sherman Taffel, from MD, also owns a nice Jensen GT also painted BRG. I found a BRG with a slight metallic addition which closely matched Mitch's car and Sherman's car. It is called Jaguar racing green from the 2005 versions of their cars. They no longer offer it as an available paint for their current lines of cars but it is easily attainable with the proper paint code.

Here's a few pictures of my car. The sun is NEVER out when I have a camera. The car actually looks better than this, but it was completely overcast when I took the pictures. we have had a horrible summer for driving top down as almost every day is rainy, overcast, or cold. 


Sunday, July 19, 2009

Preparation of the Jensen GT Travel Kit

The car is probably at least a few weeks away from being ready to drive home. The engine should be installed soon and the mechanic is just waiting for the arrival of a new header ( the original one has too many leaks) and 5 speed transmission kit which contains a box  with a new clutch, pressure plate, and throwout bearing. It didn't need the clutch parts yet, but the mechanic figured I only have about 10,000 more miles on the original, so I might as well replace the thing while everything was exposed and opened up.

In anticipation of my Dad and I traveling to pick up the Jensen GT, I started assembling the standard "Travel Kit" which all british car owners should keep with them. I learned about this from attending various Jensen meets and inspecting their trunks. I guess I have had it pretty easy in a sense with my Jensen Healey which was restored years ago. I never carried anything around but some extra oil and maybe a flashlight. my portable GPS was my best friend in the car. I drove around for years up and down the east coast and to western NY a bunch of times without much going wrong, but I figured I am flirting with disaster and at some point, I am just going to break down on the road.

I've learned quite a bit from other experts with Jensens at the various events around the northeast, so i took the time to organize my survival kit. The basic idea being...... it there is a small problem, I have a least a 50% chance of fixing it and moving on ( or at least have the parts on hand for someone else to fix). I bought a couple of storage containers at walmart measuring 17 inches X 13 inches with a sealable top.
I stuffed the following things in the two storage containers and plan to put it in the Jensen GT when I pick it up:

1) Flashlight w/batteries
2) 2 carb rebuild kits ( I shouldn't need these, but you never know)
3) socket/open end wrenches w/ screwdrivers
4) Duct Tape
5) Radiator hoses ( all 3 ) just in case.
6) Thermostat w/gasket
7) a Selection of fuses
8) various hose clamps
9) fan belt
10) disc brake pads
11) Voltmeter
12) connectors/wire strippers etc.
13) Fuel filter
14) Knife and various other tools

In another bigger crate:

4 Quarts oil ( vr-1 racing 20w/50) very hard to find in Maine. I usually buy it when I first see it in the spring, or just stock up in New Hampshire.
 brake fluid
50/50 mix antifreeze

As one Jensen owner told me at the Nationals this year........... "You Gotta carry Fluids with you, it's a British car, it tends to mark its territory more than a dog"

I didn't put in a spare fuel pump like I have in the trunk of my JH. My JH fuel pump is very easy to replace in the trunk and costs less than $50.00. It is very easy to replace and can be done in minutes on the road. The Jensen GT fuel pump is located under the car ( where the gas tank is located) and the cost of that fuel pump is about $250.00, so I may get a spare some day, but I definately won't be crawling around under the car to replace it on the road. The new one I put in this year should last a while.

Next...... final car preparations before the trip, interior shops and estimates,  and the adventure of driving it home from Salamanca NY.


Friday, July 17, 2009

The Lotus 907 engine


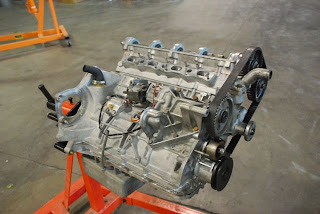
The Lotus engine sat idle in storage for about 32 years. The compression readings were low and after a "leak down" test was performed, one could conclude the rings were stuck after so many years of inactivity. I decided to have it dropped off at the machine shop in Olean, Ny for a disassembly, and general checkover. The engine didn't need a complete rebuild by any means, but anything which hasn't been run to a long time deserves a general checkover while things are opened up.


The Engine was dropped off at Glen and Dicks Automotive machine shop and the exploritory surgery was performed by a machinist over a period of quite a few months.

Once the engine was broken down the piston bores honed and pistons re-ringed, I decided to replace the main bearings and all the gaskets at the same time. I also replaced 2 suspect valves which looked just a little worn.


The cost was extremely reasonable and the labor quality was excellent.

A breakdown of total costs follows:


1. Assemble and diassemble lotus 907 engine.............. $1320.00

2. Resurface flywheel and R+R pins............................... $60.00

3. resurface aluminum head.............................................$ 50.00

4. valve job (16 valve).......................................................$150.00

5. 2 replacement lotus valves............................................$ 18.00

6. gasket set..........................................................................$150.00

7. 1 set main bearings...........................................................$125.00

8. hone 4cyl block and align.................................................$90.00

9. sealant.................................................................................$38.00

10. Replace tensioner bearings............................................$24.90

11. Plugs ( soft... brass and stainless steel)........................$11.22

12. Degrease and clean engine.............................................$150.00

13. Check and polish crankshaft...........................................$50.00

14. R+R pistons on rods, glass bead, and hone pin bores..$60.00


Total Price................................................................................$2297.12


The attached picture shows the Lotus 907 awaitng the manifold, the carburators, and the other accessories before install.


Next.... new tires, engine install and a test drive...........


Thursday, July 2, 2009

5 Speed Shifter Rebuild continued.....


And now, back to our exciting conclusion of the 5 Speed Getrag Shifter rebuild process.......


LET’S COMPARE OLD AND NEW PARTS


Rubber parts on this Shifter must have been made with 1920’s technology. Most of the Shifter assemblies that I’ve seen have rubber parts that are melted and fully deteriorated. Ditto for the plastic bushings. I replace the plastic with Bearing Bronze, and use new rubber bushings that I buy from Delta – probably the same crappy rubber, but what the heck, it will last another 20 years and can easily be replaced (this is the only part that is easy to replace).
Then there are the small 0.235 diameter pins that fit in the linkage. Well, these are always bent (you can actually see the bend in the photo, lower right) and the holes have been forced into an hourglass shape. I replace these with case-hardened larger diameter pins. Of course, the mating holes have to be drilled out to the new diameter.
The sand contamination generally wears out the bearing holes in the aluminum casting, so the casting holes are opened to a larger diameter and new bronze bushings are inserted. See the photo of the new pins being inserted in the bushings in the “assembly” section below.


Time = 0 hr. (This photo was for the blog only.)


PRECISION ASSEMBLY


In order to obtain the best possible performance from the Shifter, I hold the machining tolerances to +/- 0.001 in. Sometimes I must use “persuasion” to get the parts to fit together.
If I specified “line bore” on my drawings, the shop would charge me twice what I now pay. I can make the necessary adjustments myself – my labor is free ! ! !
Really, it takes a few hours to get the assembly properly put together, with solid bearing function and elimination of all the slop that was in the original assembly.
Time = 2 hr. plus 1 beer.


ASSEMBLE SHIFTERS AND LUBRICATE
Once the bearing sets are carefully seated, the final step is to lubricate and perform final assembly. That is the easy part. Easy is a relative term – in this case, it means no filing, sanding, burnishing etc. But, oiling and greasing is a messy business and I want to be certain that all the bearing surfaces have sufficient lubrication for the next 20 years of use. I apply three different types of Loctite to several places so the external bearing inserts don’t rotate and the set screw won’t back out.
Did you know that Loctite takes over an hour to dry???????? Have a beer while it’s hardening.
Time = 1 hr. plus 1 beer.


PACK AND SHIP
After assembly, the Shifter is a thing of beauty !
---Run to the Post Office to get a Priority packing box.
---Pack Kit in box.
---Enter address and tape box.
---Run back to the Post Office to ship. Wait in line.

Time = 1 hr. No beer. Well, after I get back from the Post Office, I had a couple………….

FINAL THOUGHTS
o These Kits turned out better than the mods I made to YELODOG Shifter – well, someone was paying me, so I felt compelled to do the best work possible.
o Fourteen hours of my effort per Kit – that’s a lot.
o 10 beers + 1 glass of red wine. I should charge for the beer…………….
o If I had orders for only one Shifter, I would be losing major $ because of machine shop costs. Having 3 sets of parts made at one time means that the shop had only one “set-up” per part.
o Set-up usually takes much longer than the actual machining of these simple parts. (while I attended university, I worked in a small shop and during my engineering career, I sent parts to machine shops on a regular basis)
o Set-up for one of the bronze bearings might take about 1 hr – machining each takes about 10 minutes. Thus:
§ Two parts at 40 minutes per part
§ Six parts at 20 minutes per part
o I’m happy to go through this effort for the benefit of other JH owners – a sloppy Shifter is a bummer !
o No, I don’t do installations.
o Memo to self: Do not take an order for only one Shifter Kit ! ! !

Tuesday, June 16, 2009

Pete Bahr Rebuilds the JH 5 Speed Shift Linkage


JH 5 spd SHIFTER WOES.
The JH 5 spd Getrag Transmission and Shifter assembly is similar to that used in some BMW models. I found it hard to believe that the BMW designers came up with such a poor design, but they did ! ! Their choice of materials and structure is such that the assembly will wear out in time. I have no idea how long it takes, but the sand

, dirt, and heat will certainly take their toll on the various components. The Linkage-Gearshift flexible joints are such that wear will take place even without the elements, because of high compressive stress loads on the materials. There are 18 joints or bearing surfaces that are subject to failure – WOW.
Bad Shifters can be made to perform better than new, with a longer service lifetime, by replacing wear points with materials less subject to wear. i.e., replace Nylon with Bronze.


REBUILD PROCESS


DEGREASE
Well, since the Shifter is behind a British engine, it’s always full of grease, oil and other road crap. De-greasing with GUNK, brush, detergent and water wash generally gets the crap off the parts. Wife generally not happy about final clean-up in her kitchen sink though.
Time = 1 hour + 1 beer.


DISASSEMBLE AND DEBURR
With it all cleaned up, it’s time to get out the files, emery cloth and deburr tools.
Time = 1 ½ hour + 1 beer.


MEASURE
Well, now comes the hard part. Some of these Shifters have parts that are so mashed up that it is impossible to measure – I know what the dimensions should be, but……………. The key here is to document all the dimensions on sketches or drawings so the next phase (design) will yield drawings that reflect the capabilities of the existing parts. The new parts to be developed and the modified parts must all fit together.
Time = 2 hours + 1 beer (after measurements completed).


DEVELOP DESIGN AND DRAWING SET
First time I did this, drawings took a couple of days to do. It is a bit easier for subsequent Shifters since I have that reference drawing set to start with. Funny, there is always an issue. Sometimes the factory parts are different from the last Shifter set. Don’t know how some of this can happen, but that’s the Jensen factory (or, perhaps BMW) for you. In total there are about 12 drawings required, being a mix of new, modified and assembly drawings. Machine shops must have proper drawings and will follow them exactly. If the drawing is not correct, neither will the part. The cost is the same for parts that fit and parts that don’t fit. Tolerances on the multitude of bearing fits are closer than 0.001 inch, and some of the bronze bushings must be press-fit into mating parts. Be certain to specify the raw material and surface finish as required. This part of the process is not for the faint of heart.
Time = 2 hours + 3 beers after I’ve finished.


ENGAGE THE SHOP
Well, now that the drawings are complete, we will have to write up an order sheet – part numbers, quantity etc. Make copy for the shop and one for me. Get in the car and make the trip to the shop. Review the order and ask for a completion date / lead time. Always double the quoted time. Ask for a cost estimate and join in the laughter. This is a time and material job, not fixed price. For Pete’s Kits items, I always hope the final cost will be less than the price I’ve quoted to Jensen Healey owners.
Time = 1 ½ hours. No beer, as the New Jersey laws do not allow you to drink and drive.


PICK UP THE FINISHED PARTS


After a reasonable period of time, phone the shop and confirm that the lead time is, indeed, twice what was quoted. Finally, drive to the shop (avoid the commuter rush hour). Check the box of completed parts and see if they are all done and the parts that should fit together really do. Well, you forgot to make PN 99267 – “OK, OK, I’ll make it today and drop off at your house on my way home”. Yeah, really.
I can’t stand the pressure, how much is this going to cost me? Wow, THAT MUCH! “Well, I should really charge you more, but I’m a nice guy”. Thanks, here’s a check. Drive home and hope the rest of the parts arrive tonight.
Reviewing the parts at home, I find three parts that I didn’t order. I was able to buy 5 of these parts from Delta at $10 each – the three made at the shop cost me $22.68 each. What a bargain. In any case, I now have an inventory of this part enough for 7 more Shifters. That’s enough to last me till the year 2025.

ASSEMBLE SHIFTERS AND SHIP....... the exciting conclusion to come!

Wednesday, May 13, 2009

Pete's Kit's, Paint Jobs, and Engine work.......

We seemed to be moving along quite well. Kenny got the engine running after rebuilding the carburetors but wasn't happy with the engine compression. The readings were about 80 pounds across the four cylinders. Ken thought the best route to go would be to re-ring the engine as that was the only thing he could see wrong with an engine with about 26,000 miles. He theorized the rings were stuck from the long storage time and to be on the safe side, the engine should be given a thorough inspection. He recommended replacing the rings, gaskets, and any valves, and reassembling the engine. He knew a great machine shop in the area and quickly removed the engine from the car, delivered the engine to the machine shop where it sat, and sat, and sat for about 3 months or so.

In the meantime, while the engine was sitting in the machine shop waiting for the next ice age, Randy, from Randy's Collision in Great Valley , NY picked up the Jensen GT and was tasked with doing some light bodywork and re-painting the car the original color ( a metallic Saturn Gold). Kenny said he was looking for work as things were a bit slow, so he was anxious to start working on the car. Apparently, Kenny was very happy with his bodywork and paint jobs so he recommended his work highly. I have been through this before, and remembered a body shop telling me in Maine how they prioritize work. Insurance work is given first priority as it is clearly the most profitable. The last priority is non-insurance work.......... I remembered this as my car sat at Randy's collision for months with no real work being accomplished and never a phone call from them. I called them a few times to check on progress. Oh, they were working on it, but at glacial speed. I am not sure who could move faster in a race........ a starfish or Randy's collision service. I think I would put my money on the starfish.
I really wanted to get my car painted in Maine with people I knew and trusted, but my engine was completely out of the car for months on end, it couldn't move, so I didn't have much of a choice when it came to bodywork.


Well, they finished the car and I will say the paint job looks nice. If I were grading them, here is how I would have put things in summary.


1) Paint and bodywork - A


2) Communication - C-


3) Organization - F ( they broke some parts, lost some others, and really didn't seem to care as I had to pick up the tab for their mistakes )


4) Price - C ( let's just say, I am from Maine and they knew it)


5) Timeliness - D


Pete's Kits - Buying a kit from Pete Bahr is a wonderful experience. Pete is a retired engineer which automatically puts him in the RSG category ( Really Smart Guy). He also owns one of the fastest Jensen Healey's on the planet. His Jensen has all the "Goodies", which help it produce around 230 hp. During his upgrade and restoration, Pete developed and engineered some custom "Kits" which help the Jensen perform better, safer, and more reliably than stock. Pete is the type of guy who can be as comfortable in a 5 star restaurant as he can in a NY "dive" bar filled with drunks and cigarette smoke. Pictures of Pete's "YELOWDOG" can be seen here at http://jhppg.com/gallery/main.php?g2_itemId=27088

I had the privilege of driving "YellowDog" and must say this car is just mind blowing. This car is not for the timid as one steps on the gas, but it also has very good low end manners which is probably due to the special distributorless ignition system.


The kit's Pete sells always fit perfect, perform as stated, and are easy to install. He developed them as new parts were no longer available or redesigned parts which would perform better than the original resulting in more reliability and safety.
I bought the 5 speed transmission shifter upgrade kit. Every original getrag 5 speed unit wears within 25,000 miles. The transmission is fine, but the shifter linkage wears pre-maturely resulting in hard shifts, and trouble "finding" the correct gear. The problem is like an enlarging prostate for men...... it's not "if" it is going to happen as men age, but "when" it will happen. The only cure is the Delta Motorsports bushing Kit...... which will fix the problem temporarily, or the Pete's Kit Upgrade, which will fix the problem permanently.


Sunday, May 3, 2009

Kenny begins work on the car......

Ken Day, owner of Day Auto service in Great Valley, NY started working on the car after I ordered a bunch of parts from Delta Motorsports, and www.rejen.com across the pond. Jeff Peterson was given full "power of attoney" in my absence to make all decisions on the car restoration. He has done this three times before, so he has plenty of experience and I trust his judgement.


Brake System:


Kenny started out releasing the brakes and overhauling the Brake system on the Jensen GT. He repaired the Emergency Brake and flushed the brake lines. He replaced the front brake rotors and rebuilt the calipers. He added new high performance disc pads from Delta Motorsports. On the rear brakes, he turned the drums and replaced the drum brakes, wheel cylinders and wheel bearings. Kenny found the master cylinder was leaking badly. Instead of rebuilding the original, I elected to replace the master cylinder with a brand new direct replacement...... a TR6 Master cylinder. Once completed the car was topped off with DOT 4 brake fluid and tested. The brakes were now complete.


Fuel System:


The fuel tank was lowered from the bottom of the car and sent out for cleaning. The fuel lines were flushed and replaced where needed. The older mechanical fuel pump was removed and replaced with a new SU electronic version. The fuel filter was replaced with one placed before the two stromberg carbs.


Carburators:


The 2 stromberg carbs were leaking badly. The seals were worn. The rebuild kits contain about 12 different gaskets and 4 replacement parts. This will usually get them running well, and since the car only has about 26,000 miles, this should be enough. The cost to rebuild a set of carbs is about 2 hours labor and the cost of the rebuild kits. This usually runs about $150.00. If this doesn't work, the carbs have to be sent out to a specialty shop which will promptly replace all the worn items..... valves, fuel metering needles, as well as any adjusting screws, and will rebuild the entire linkage. This costs about $500.00. Usually, unless the condition of the carbs is obvious, most people try the cheaper route first.


Cooling system:


The original water pump was leaking badly and making a little noise. In a Lotus, this is never a good thing and it a sign of bad things too come. I had Kenny remove the water pump and send it out for a complete rebuild. The new water pump design really improves the cooling efficiency in the lotus. My other Jensen also has the new style pump, and I have never had a problem.


The Radiator was not as easy. The car was missing a radiator. Most people would think this is an easy thing to replace. Well, not really, as there are only about 250 of these car shipped to the United States and it is a completely different radiator than the Jensen Healey. When attempting to equip the Jensen GT with a radiator, there are only two options.


1) Go to a specialty radiator shop like www.wizardcooling.com, and pay them to design and build a custom aluminum radiator.


2) Call rejen across the pond and talk to Alison. She and her husband own the place and completely restore all models from Jensen motors. They have stockpiles of NOS ( New Old Stock) parts for the GT. She just happened to have a Brand New Jensen GT radiator in stock sitting on the shelf. I bought the radiator from Rejen and it arrived about 3 weeks later. It was in perfect condition, but I wanted to modify it correctly so it would not overheat as easily. The local radiator changed the internal cores from " 2 Row" to "3 Row". This will greatly improve the cooling ability of the radiator. At the same time, I had the radiator shop add a drainage tap so I can drain the coolant easily. Now, I just twist a lever and the coolant pours out of the radiator without removing the radiator hose and spilling it all over the garage.


Hoses belts and other things.......


Kenny replaced the timing belt ( which is very critical), the alternator and air conditioning compressor belts as well as most of the other rubber hoses under the hood. This car needs a timing belt replaced every 8- 10,000 miles or so. Kenny removed the original brake hoses and replaced them with custom stainless steel brake lines. It is only good maintenance practice to replace the radiator hoses, vacuum hoses, heater hoses, and oil cooler hoses.

Next up is the engine and bodywork.....


Taking Inventory for the restoration


Jeff and Laura Peterson were kind enough to check out the Jensen GT for me and arrange for an initial inspection by their trusted mechanic "Kenny" from Day Auto Service in Great Valley, NY. This would help me prioritize work and order parts before the restoration actually begins. Some parts can take months to procure but most parts can be found at "Delta Motorsports" in Arizona and the JHPS ( Jensen Healey Preservation Society) Club Store.

In the hatchback of the Jensen GT, Jim included a great deal of parts for me to utilize when restoring the GT. He put a spare windshield in the back to replace the cracked one presently on the car. This was a huge help as they are very expensive to replace and coupled with the high shipping costs from Arizona ( if they have them in stock), replacement costs alone for the part can reach about $750.00.  He included  stromberg carburator rebuild kits and all the manuals and other documentation which originally came with the car.  Jim removed at some point, all the emission engine controls, pumps, and hoses, which was great. In the mid 70's emission controls were added to cars and in the US, this was mandatory. It bogged down the Lotus 907's power. They added the stuff on to the engine without modifying it too much.  They added originally in 1976 the following things which attributed to loss of pickup and power as well as contributed to OVERHEATING and increases maintenance:

1) Catalytic Converter
2) Anti- run on System
3) AIR PUMP

These things were already taken off the vehicle and stored in the hatchback of the Jensen GT. I will definately will not be needing these again. Once these things were taken off, I can only imagine performance must have improved. In fact, every GT which I have seen restored, does not have any of these controls installed. Mine will not either.

The car was missing a radiator and a few marker lights on the right side. That was it. Besides minor body work on the right side of the car and some  interior refinishing ( headiner, new carpet, dash, and seat covers), the car was basically in very good shape.  Having already restored a Jensen Healey from the ground up, I am very familiar with all the hoses, belts, brake and fuel lines which will need replacing as well as all the upgrades which are now available for the engine. 

Some of the new upgrades items which are available for the Jensen Healey/GT are:

1) New improved water pump ( The original is completely rebuilt and new, better designed parts with longer wear are now available. The car is less likely to overheat as new improved bearings are used and better seals making leakage a thing of the past)

2) New improved Gear shift kit. This kit was designed by a retired engineer ( Pete Bahr). I send him the original shifter linkage and Pete rebuilds the entire assembly utilizing aluminum bushings to replace the fast wearing plastic bushings. The assembly once completed allows crisp shifts with no more trouble "finding" the proper gear.

3) Inproved Lucas alternator...... Well, it's Lucas, but it is supposed to be better than the original. It gives a little more power than the original with better  longtivity.

4) New electronic SU fuel pump to replace the original mechanical version.

5) Petronix ignition - Allows reliable starts and end the replacement of points  and condensor on a regular basis.

6) New three Core Radiator to replace the original 2 core radiator. Solves the cooling problem once and for all with combined with the improved water pump.

7) Dimmer switch and dashboard light upgrade. It took almost 30 years to come up with these but what a wonderful upgrade. The Dimmer  switch is a modified Jaguar XJ6 85-87 and the new bulbs actual put out enough light to see the instruments at night without putting excessive draw on the electrical system. Frank Schwartz, from Hendersonville, TN designed this upgrade. After this upgrade is done, the driver actually had to turn down the dimmer switch so the lights are not too bright.

8) Headlight relays..... allows brighter headlights and less electrical power going through the headlight switch.

9) Air Conditioning - Change parts for the new environmentally safe "gas"

10) Replace original "eyebrow" interior console lights with New super bright  bulbs  and red Lenses.

If I was rebuilding the engine completely, there are many options available, but a complete rebuild will not be necessary as this car has low mileage of 26,000 on the odometer.


Thursday, April 23, 2009

It's a Great looking Jensen GT


I emailed Jim and received a quick reply along with some pictures of the car. He was in the middle of moving some things at his sisters place and the Jensen GT was one of his cars which he had stored at her house. He emailed me some initial pictures and described the condition of the car as best he could. The car looked beautiful and although it needed a bit of TLC, it was in much better shape than many Jensens which need restoration today. Jensens came from the factory with NO RUSTPROOFING applied to the car. My Jensen Healey which I restored in 2005, needed the usual mechanical systems rebuilt, but it also needed quite a bit of bodywork. Bodywork with my first Jensen Healey was something which started out as "minor" and ended up as "major"as more rust was discovered as things were inspected and slowly uncovered. Even the most knowledgable body man can not see the extent of corrosion to the naked eye. Jim was confident this Jensen GT did not have any rust and upon later inspection he was absolutely right.
Over the long storage time, the brakes had frozen to the drums, which made the car difficult to move. Jim needed the car moved off his sister's property with out delay, so I hired a tow truck with a flat bed to winch the car onto the deck and move it safely. I promised Jim I would restore the car to its original condition, and would start to work on it as soon as the car arrived in New York with my friends Jeff and Laura. It was a wonderful gesture to receive such a nice car, I sent down the biggest Maine Lobster Dinner I could find for Jim and his family. I thought it was the least I could do.


I received the car from the shipping company about three weeks later. I had it shipped to Salamanca Ny as my friend Jeff Peterson graciously agreed to look after the car as I planned the restoration from various providers in the Salamanca area. Since Jeff has fully restored 3 Jensens, he had access to a slew of people with Jensen experience. I figured I would come up and visit every few months and plan out each step of the restoration as my time and budget permitted.


Attached are some pictures of the car the day it arrived in NYC.

Tuesday, April 21, 2009

Restore another Jensen ?

It all started after a phone call from one of my best friends, Jeff Peterson on a Sunday night in June of 2008. I met Jeff and Laura a few years back at one of the yearly Jensen National conventions in Cherry Hill, NJ and we quickly became good friends. Jeff lives in a beautiful house in Salamanca, NY with a really neat feature....... it has a 5 car oversized garage. Jeff would call it a "car enabling garage" as it wasn't long until he filled it with cars and all available space was used. Jeff had restored 3 Jensens........ a Jensen GT, a Jensen Healey, and a Jensen Interceptor. The other two bays housed a a Chrysler Pacifica and a Dodge Stealth.


Jeff called me and prepped me gently by asking a few probing questions. "John, there is a guy who is giving away a Jensen GT for absolutely no money. He would like it to be restored and not parted out, but he does need it removed rather quickly. Apparently, it is in very good shape." I had finished restoring a Jensen Healey from the ground up in 2005, so I am obviously familar with the costs and procedures. I balked at the idea as common sense kicked in pretty fast. This a really stupid thing to do. One should NEVER restore a car. One should buy a car that someone else restored. That is the smart, well thought out thing to do. Well, I started asking all the stupid questions which I knew would lead me down the path of Jensen GT Ownership and soon started justifying spending 1000's of dollars on an unknown car.What will I do with two Jensens?. Where will I store the second one?. This Jensen GT is rare and could need a lot of work and it may not be worth the price even if the car is free. Besides, winter will be approaching and what will my wife think about another Jensen. We really do not have storage space for two Jensens; She would never let me hear the end of it. BUT..... the Jensen GT is a very unique car. There were only about 250 or so imported from England before Jensen Motors went into receivership in 1976. The other 250 cars of the 511 total cars produced reside on the other side of the pond. The car has a hardtop and a glass hatchback design and it's loaded with many options and upgrades which the original JH convertible was lacking offering a completely different driving experience. It comes with plush Uplholestery and 2 rear seats which are big enough for a midget or a couple of cats. Wait a minute...... scratch the cats..... they should never be allowed in a Jensen. It has a remotely activated glass hatchback and a rear wiper and rear defroster. It had power windows, airconditioning and a cassette deck. It also has a beautiful walnut burl dashboard which is completely different from the original Jensen Healey dashboard. It even has a super secret hidden storage area in the back and out of view of all wandering eyes. Jensen motors stilled used the wonderful Lotus 907 engine, but when they added an airconditioning compressor, and additional smog controls to satisfy the US government, performance and handling suffered with the extra weigh and center of gravity changes. It did have a 5 speed "close ratio" transmission which while not meant for highway cruising, it would certainly allow spirited driving around country roads.

Then I thought a little more........ I remember when I was 15 years old, my Dad and I had some fun trips in his MGB as we attended New England Patriot Football games ( tickets were only $10.00) and cruised home top down at night. I wondered if my daughter would be interested in a car like this. This would never be a daily driver for her as it will require maintenance and if it did breakdown, she would be stranded. She always been a good sport and eager to learn new things, so I figured before I become too nerdy to be seen around her and her friends, she could learn to drive this car and cruise around for fun. She will learn that listening to an engine rev up and down the gears is more fun than blasting wierd rap music in an IPOD over the speakers. She will learn that car guages in old cars actually move around and tell the driver things which are happening under the hood. I can show her alot of things and we will do it together and have fun. Then, when I do become a bit too nerdy for her, she can take off without me and enjoy a car from another time with her own friends....... and a AAA card in her pocketbook.

Jeff gave me the email address of the owner and I agreed to email him immediately.